Are you a yoga student looking to elevate your practice with a powerful and invigorating pose? Look no further than the dolphin pose! This rejuvenating yoga asana not only strengthens your core and upper body but also increases flexibility and focus. Whether you’re a beginner or an experienced yogi, mastering the dolphin pose is within your reach. In this tutorial, we will guide you step by step on how to do dolphin pose with grace and precision. Get ready to dive deep into the world of this transformative posture and unlock its incredible benefits. Let’s get started!
What are the benefits of dolphin pose?
Dolphin pose, also known as ardha pincha mayurasana in Sanskrit, is a powerful yoga pose that offers numerous benefits for both the mind and body. If you are a yoga student looking to improve your practice, incorporating dolphin pose into your routine can be extremely beneficial.
One of the key benefits of dolphin pose is its ability to strengthen and tone the entire body. By placing your forearms firmly on the ground and lifting your hips towards the ceiling, you engage your core, arms, shoulders, and legs. This not only helps to build strength but also improves stability and balance. Regular practice of dolphin pose can result in increased muscle tone and definition, giving you a strong and sculpted physique.
Another advantage of dolphin pose is its ability to improve flexibility, particularly in the shoulders and hamstrings. As you lower your head towards the ground and press your chest towards your thighs, you stretch and lengthen these areas, releasing tension and increasing your range of motion. This can be particularly beneficial for those who spend a lot of time sitting or working at a desk, as it counteracts the effects of poor posture and tight muscles.
In addition to physical benefits, dolphin pose also has a positive impact on mental well-being. This pose activates the third eye chakra, which is associated with intuition, clarity, and insight.
What are the contraindications for dolphin pose?
While dolphin pose offers many benefits, it is important to be aware of any contraindications before practicing this pose. If you have any injuries or conditions that impact your wrists, shoulders, or neck, it is best to avoid dolphin pose or modify it accordingly. Additionally, if you are pregnant or experiencing high blood pressure, it is recommended to consult with a qualified yoga instructor before attempting dolphin pose. Safety should always be a top priority in your yoga practice, so listen to your body and make any necessary adjustments to ensure a safe and comfortable experience.
What are the steps to do dolphin pose?
Step 1: Preparation:
1. Begin in a tabletop position, with your hands and knees on the mat.
2. Align your wrists directly under your shoulders and your knees under your hips.
3. Spread your fingers wide, pressing firmly into your palms for stability.
4. Engage your core muscles by drawing your navel towards your spine.
5. Allow your gaze to soften, focusing on a point between your hands.
Step 2: Transition into Dolphin Pose:
1. From the tabletop position, lower your forearms to the mat, keeping them parallel to one another.
2. Ensure your elbows are directly below your shoulders, forming a 90-degree angle.
3. Activate your shoulder blades by drawing them down and back, broadening your upper back.
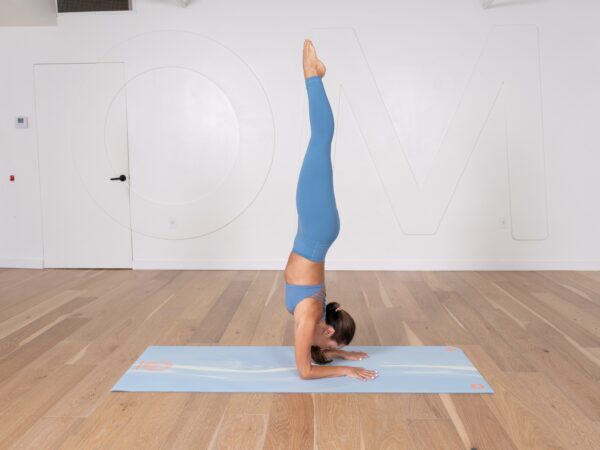
4. Press firmly into your forearms and lift your hips or sitting bones towards the ceiling, coming into an inverted V-shape. You’re in a downward facing dog shape but you are on your forearms.
5. Lengthen your spine by gently pressing your chest back towards your thighs.
Step 3: Finding Stability and Alignment:
1. Check your alignment by ensuring your head is in line with your arms, creating a straight line from the crown of your head to your tailbone.
2. Distribute your weight evenly between your forearms and your feet, grounding down through your hands and pressing into your toes.
3. Engage your leg muscles by pressing your heels towards the ground, straightening your legs as much as possible without locking your knees.
4. Maintain a soft bend in your knees if needed to protect your joints.
Step 4: Breathing and Relaxing:
1. Take deep, slow breaths in and out through your nose, allowing your breath to be smooth and steady.
2. Relax your face, jaw, and neck, releasing any tension you may be holding.
3. Notice the sensations in your body and embrace the stillness and peace of the pose.
How long should you hold dolphin pose?
If you’re wondering how long you should hold dolphin pose, the answer is that it depends on your individual practice and capabilities. While some yogis may be able to hold the pose for several minutes, others may find it challenging to maintain the position for more than a few breaths. The key is to listen to your body and find a balance between effort and ease.
As a general guideline, it is recommended to hold dolphin pose for about 30 seconds to one minute. This duration allows you to experience the benefits of the pose without placing excessive strain on your muscles and joints. Over time, as your strength and flexibility improve, you can gradually increase the duration of your hold.
Holding dolphin pose for this length of time allows you to engage the core muscles, strengthen the shoulders and arms, and lengthen the spine. It also helps to stretch and open the shoulders, upper back, and hamstrings. Additionally, the inverted position of dolphin pose increases blood flow to the brain, promoting mental clarity and focus.
Remember to focus on your breath while holding dolphin pose. Inhale deeply through the nose, filling your belly and rib cage with air, and exhale slowly through the nose, releasing anytension or tightness in your body. This deep breathing helps to calm the mind and relax the body, allowing you to fully experience the benefits of the pose.
Modifications for dolphin pose
Supported Dolphin Pose: Start with your forearms on the floor, but place a folded blanket under your elbows for added support and comfort. This reduces the pressure on your wrists and can make the pose more accessible.
Dolphin on the Wall: Stand facing a wall and place your forearms on the floor, about a foot or two away from the wall. Walk your feet back and press your hips up toward the ceiling. Your body will be at an angle, with your head and chest moving towards the wall. This variation helps you get used to the sensation of being upside down and builds strength in the shoulders and core.
Dolphin Plank Pose: From dolphin pose, shift your weight forward so that your shoulders are directly over your wrists, and your body forms a straight line from head to heels. This variation builds upper body strength and prepares you for more advanced poses like forearm stand.
Dolphin with Leg Lifts: From dolphin pose, lift one leg off the floor while maintaining a stable dolphin position. Hold for a few breaths and then switch to the other leg. This variation challenges your balance and engages your core muscles.
Watch this YouTube video with Kino to find out more about the pose.
In conclusion, dolphin pose is a powerful and invigorating yoga pose that provides numerous benefits for the body and mind. Whether you’re a beginner or an advanced practitioner, there are modifications and variations available to suit your needs and level of flexibility. By incorporating dolphin pose into your regular yoga practice, you can strengthen your shoulders, core, and upper body, improve your balance and stability, and build confidence in being upside down. So don’t hesitate to give dolphin pose a try and experience the transformative effects it can have on your overall well-being. Embrace the challenge, embrace the strength, and embrace the beauty of dolphin pose in your yoga journey.
Are you looking for more guidance on your yoga journey? Sign up for Omstars to get access to thousands of yoga classes in the comfort of your own home. Click here to start your subscription.