Are you a beginner in the world of yoga? Are you ready to take your practice to the next level? Look no further than the L-Sit. This challenging pose may seem intimidating at first, but with the right instruction and practice, you will be able to conquer it in no time. In this article, we will guide you through the secrets of the L-Sit, providing step-by-step instructions to help you master this powerful pose. Get ready to strengthen your core, increase your flexibility, and take your yoga practice to new heights. Let’s dive in and learn the secrets of the L-Sit together.
What are the benefits of L-sit?
The L-Sit offers a multitude of benefits that can greatly enhance your yoga practice and overall well-being. Here are some of the key benefits of incorporating the L-Sit into your routine:
1. Core Strength: The L-Sit primarily targets your core muscles, including your abs, obliques, and lower back. You will improve your posture, stability, and total core strength by engaging and strengthening these muscles.
2. Arm and Shoulder Strength: In addition to your core, the L-Sit also challenges your upper body strength, particularly your arms and shoulders. As you hold your body weight so it’s hanging off the ground, you will develop stronger arms, shoulders, and wrists, which can enhance your performance in other yoga poses and daily activities.
3. Balance and Stability: The L-Sit requires a great deal of balance and stability. By practicing this pose regularly, you will improve your proprioception (awareness of your body in space), refine your balance, and develop greater stability throughout your entire body.
4. Flexibility: The L-Sit also stretches the hamstrings, hip flexors, and lower back, promoting greater range of movement in these areas. Improved flexibility can lead to better posture, reduced risk of injury, and increased range of motion in other yoga poses.
5. Mental Focus: As with any challenging pose, the L-Sit requires concentration and mental focus. By training your mind to stay present and focused.
What are the contraindications for L-sit?
While the L-Sit offers numerous benefits, it’s important to be aware of any contraindications or conditions that may make this pose unsafe or unsuitable for certain individuals. Here are some contraindications to consider before attempting the L-Sit:
1. Wrist or Shoulder Injuries: If you have any current or past wrist or shoulder injuries, it’s best to avoid the L-Sit or modify it to avoid putting excessive strain on these areas.
2. Lower Back Issues: Individuals with lower back issues, such as herniated discs or chronic pain, should exercise caution when attempting the L-Sit.
3. Pregnancy: Pregnant individuals should avoid practicing the L-Sit, as it places pressure on the abdomen and may not be suitable for the changing needs of the body during pregnancy. Instead, focus on other safe and beneficial yoga poses recommended for pregnancy.
4. High Blood Pressure: The L-Sit can increase blood pressure due to the intensity of the pose. If you have high blood pressure or any heart-related conditions, it’s important to consult with a healthcare professional before attempting this pose.
What muscles are involved in an L-sit?
In order to understand which muscles are involved in an L-sit, let’s break down the pose and look at each component individually.
The L-sit primarily targets the following muscles:
1. Core muscles: The core muscles, including the rectus abdominis, transverse abdominis, and obliques, are heavily engaged during an L-sit. These muscles help to stabilize and support the body in a seated position with the legs extended.
2. Hip flexors: The hip flexor muscles, specifically the iliopsoas and rectus femoris, play a crucial role in lifting the legs off the ground and maintaining an L-shaped position. These muscles are responsible for flexing the hips and bringing the legs towards the torso.
3. Quadriceps: The quadriceps, which are the muscles on the front of the thighs, are activated to keep the legs straight and extended. They work in conjunction with the hip flexors to maintain the L-shaped position.
4. Shoulders and triceps: The shoulders and triceps are engaged to support the upper body weight and lift it off the ground. They help to stabilize the arms and maintain the L-sit position.
5. Lower back muscles: The erector spinae muscles in the lower back are involved in maintaining an upright posture during an L-sit.These muscles provide stability and prevent excessive rounding of the back.
6. Chest muscles: The chest muscles, including the pectoralis major and minor, are activated to support the upper body and maintain proper alignment during an L-sit.
Step by Step Tutorial for L-Sit
Follow these steps to do L-sit at home on your yoga mat.
1. Sit on your mat with your legs extended in front of you.
2. Place your hands on the mat on either side of you, fingers pointing forward. Your hands should be slightly in front of your hips.
3. Engage your core muscles by drawing your belly button in towards your spine.
4. Press your hands firmly into the mat to lift your body off the ground, keeping your legs straight and extended.
5. Maintain a straight spine.
6. Hold this position for five breaths.
Here’s a video lesson with Kino that will help you learn how to do L-sit.
How can I safely perform an L-sit?
Let’s take a look at the safe and effective way to perform an L-sit, ensuring you maximize your progress while minimizing the risk of injury.
Step 1: Build a Solid Foundation
Before attempting an L-sit, it’s crucial to establish a strong core, as this pose heavily engages the abdominal muscles. Incorporate exercises like plank variations, boat pose, leg raises, and other strength-building drills into your routine to develop core strength gradually. Remember, patience is key!
Step 2: Warm Up
Prepare your body for the L-sit by warming up properly. Start with a few rounds of sun salutations or dynamic stretches to increase blood flow, loosen up the joints, and activate the muscles you’ll be using during the pose.
Step 3: Find the Right Equipment
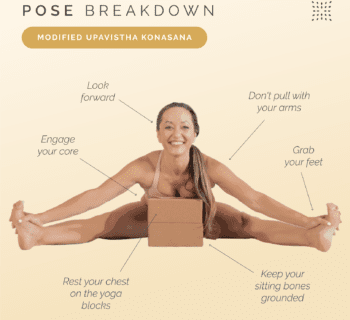
The right props can make a big difference when you’re learning a new pose. Sturdy yoga blocks can be a useful tool when attempting this pose. They’ll provide the necessary elevation and support for your hands, allowing you to maintain proper form.
Step 4: Proper Hand Placement
Position your hands shoulder-width apart, with fingers pointing forward. Ensure that your wrists are in a neutral position, neither flexed nor extended, to prevent unnecessary stress on the joints.
Step 5: Engage the Shoulders and Triceps
With your hands firmly placed, engage your shoulder and tricep muscles to support your upper body weight and lift it off the ground. This will help you maintain the L-shaped position. Focus on keeping your shoulders down and away from your ears to avoid any tension or strain.
Step 6: Activate the Lower Back Muscles
Maintaining a tall, upright posture is essential for a proper L-sit. To achieve this, activate your lower back muscles, particularly the erector spinae muscles. Contract them to keep your spine straight and prevent excessive rounding of the back. Imagine lengthening through your tailbone and lifting your chest slightly to maintain proper alignment.
Step 7: Strengthen the Chest Muscles
To support the upper body and maintain stability during the L-sit, engage your chest muscles. Activate the pectoralis major and minor by drawing your shoulder blades slightly together and down towards your back. This will help you maintain a strong and steady position throughout the pose.
Step 8: Practice and Progress Gradually
Like any yoga pose, mastering the L-sit takes time and practice. Start by holding the position for a few seconds and gradually increase the duration as your strength and stability improve. Don’t push yourself too hard, and listen to your body’s limits. As you practice regularly, you’ll find yourself making regular progressions toward holding the pose longer and longer.
What exercises can be used to prepare the body for an L-sit?
If you’re looking for more specific exercises to make doing L-sits a bit easier, here are a few to get you started.
1. Foundation-Building Plank Pose:
Begin by mastering the plank pose, a fundamental exercise that strengthens your core, arms, and shoulders — the key areas involved in the L-sit. Start pushing up, ensuring your wrists are under your shoulders. Engage your core by drawing your navel towards your spine and maintain a straight line from head to heels. Don’t let your hips dip or sag. Hold this position for 30 seconds, gradually increasing the duration as you build strength.
2. Engaging Your Hip Flexors with Knee Raises:
Practice knee raises to stimulate your hip flexors, which play a crucial role in the L-sit. Sit on the edge of a stable chair or bench, with your hands gripping the sides for support. Extend your legs out in front of you and raise your knees towards your chest. Aim for three sets of ten repetitions, gradually increasing the height of your knee raises over time.
3. Developing Core Strength with Hollow Body Holds:
The L-sit heavily relies on a strong core, so incorporating hollow body holds into your routine is essential. Lie on your back with your arms by your sides and your legs straight out in front of you. Engage your core by pressing your lower back into the ground and lifting your legs and upper body off the floor, creating a “hollow” shape. Hold this position for 20-30 seconds, gradually increasing the time as you progress.
4. Building Shoulder Stability with Push-Ups:
Strong and stable shoulders are crucial for maintaining the L-sit position. Regular push-ups are excellent for developing this strength. Begin in a high plank position, ensuring your hands are slightly wider than shoulder-width apart. Lower your body towards the ground, keeping your elbows close to your sides, and push back up to the top position. Aim for three sets of ten push-ups, gradually increasing the intensity as you become stronger.
5. Enhancing Flexibility with Pike Stretch:
The L-sit requires flexibility in the hamstrings and lower back, making the pike stretch a valuable addition to your routine. Sit on the floor with your legs extended in front of you, feet flexed. Reach forward with both hands towards your toes, keeping your back as straight as possible. Hold this stretch for 30 seconds, gradually working towards touching your toes with your fingertips.
How long should I hold an L-sit?
If you’re just starting to learn yoga and have set your sights on mastering the L-sit, you might be wondering how long you should hold this challenging pose. The answer, my friend, depends on your current level of strength and flexibility. As a beginner, it’s important to approach this pose with patience and a realistic mindset. Rome wasn’t built in a day, and neither will your L-sit.
When you first begin practicing the L-sit, you might find it difficult to hold the pose for more than a few seconds. Don’t be discouraged! Start with what you can manage and gradually increase your hold time over days, weeks, and months.
A general guideline for beginners is to aim for 10-15 seconds of holding the L-sit. This might seem like a short duration, but trust me, it’s challenging enough for those just starting out. As you build strength and flexibility, you can gradually increase your hold time to 20, 30, or even 60 seconds.
Remember, the key is to listen to your body and not push yourself too hard too soon. Straining or forcing yourself into a longer hold time can lead to injuries or frustration. It’s important to find a balance between challenging yourself and being mindful of your body’s limitations.
Are there any modifications I can do to make the L-sit easier?
1. Elevated L-Sit:
To ease into the traditional L-sit, begin by using props or elevated surfaces like yoga blocks or step stools. Place your hands on the blocks, fingers pointing forward, and lift your body off the ground, keeping your legs extended in front of you. This modification reduces the demand on your core muscles and allows you to gradually build strength and stability.
2. Knee Tuck L-Sit:
Another modification to consider is the knee tuck L-sit. Start by sitting on the floor with your hands slightly in front of your hips and fingers pointing towards your feet. Bend your knees and bring them towards your chest, lifting your feet off the ground. Lean forward, pushing into the arms and try to lift your bum off the floor. Maintain a strong core engagement throughout the pose. This variation not only reduces the intensity but also helps you develop the required strength and stability for the full L-sit.
3. One-Leg L-Sit:
If you can lift both feet off the ground in an L-sit, try lifting just one off the ground. Then try again with the other leg. Over time and with practice, you’ll be able to lift both off the ground.
In conclusion, learning the L-sit can be challenging for beginners, but with patience and consistency, you can gradually build the strength and flexibility needed to hold the pose for longer durations. Remember to listen to your body and not push yourself too hard too soon. If you find the traditional L-sit too difficult, there are modifications such as the elevated L-sit, knee tuck L-sit, and one-leg L-sit that can help you ease into the pose and develop the required strength and stability. So don’t be discouraged, keep practicing and you’ll soon be able to master the L-sit and reap the benefits it brings to your yoga practice.
Are you looking for more guidance on your yoga journey? Sign up for Omstars to get access to thousands of yoga classes in the comfort of your own home. Click here to start your subscription.