Looking to master the handstand tuck? All levels of yoga students can benefit from experimenting with this pose. When you attempt to learn a challenging posture like handstand tuck, you’ll find that the movement involved in practicing the pose will help you experience a progression in other poses too. Training to get upside down in inversion is an excellent way to build strength and confidence. This guide will provide you with step-by-step instructions and tips to help you achieve this challenging yoga pose.
Benefits of practicing handstand tuck
Practicing handstand tuck can offer a range of benefits for yoga students. These include improved upper body strength, enhanced balance and stability, increased core engagement, improved focus and concentration, increased flexibility and mobility in the hips, and a boost in overall body awareness and control. Handstand tuck can specifically help strengthen and tone the following regions:
Upper body: Practicing handstand tuck engages the muscles in the arms, shoulders, and upper back, helping to build strength and definition in these areas.
Core: The core muscles, including the abdominals and obliques, are actively engaged during handstand tuck, helping to improve core stability and strength.
Shoulders: Handstand tuck requires the shoulders to support the body weight, which can help to strengthen and stabilize the shoulder joints.
Balance and coordination: Handstand tuck challenges your balance and coordination skills, helping to improve your overall body control and proprioception.
Mental focus: Performing handstand tuck requires concentration and focus, which can help to improve mental clarity and mindfulness.
Confidence: Successfully mastering handstand tuck can boost your confidence and self-esteem, as it is a challenging pose that requires strength, balance, and determination.
Contraindications of handstand tuck
While handstand tuck can offer numerous benefits, it is important to be aware of the contraindications associated with this pose. Individuals with the following conditions or concerns should avoid or modify the practice of handstand tuck:
High blood pressure: Handstand tuck involves an inversion of the body, which can increase blood pressure. Individuals with uncontrolled high blood pressure should avoid this pose.
Neck or shoulder injuries: Handstand tuck puts significant pressure on the neck and shoulders. Those with existing neck or shoulder injuries or conditions should avoid this pose or modify it with the guidance of a qualified yoga teacher.
Wrist or arm injuries: The weight-bearing nature of handstand tuck can put strain on the wrists and arms. Individuals with wrist or arm injuries should avoid this pose until they have fully recovered.
Pregnancy: Pregnant women should avoid practicing handstand tuck, as it involves an inversion and can put pressure on the abdomen. It is important to consult with a healthcare provider before attempting any inversions during pregnancy.
Eye conditions: Individuals with eye conditions such as glaucoma or detached retina should avoid inversions like handstand tuck, as they can increase intraocular pressure.
Always listen to your body and consult with a qualified yoga teacher or healthcare professional if you have any concerns or pre-existing conditions before attempting handstand tuck or any other challenging yoga pose.
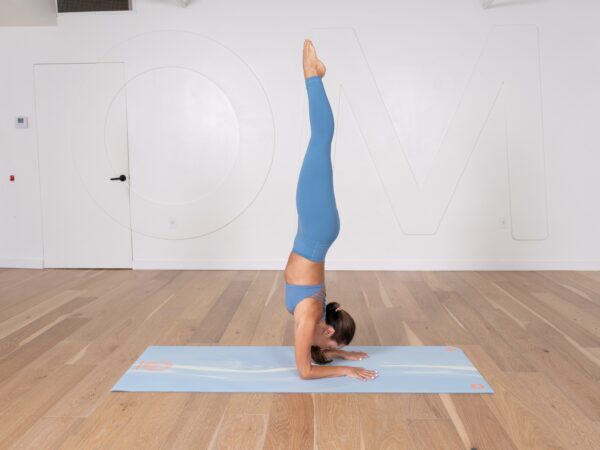
Step-by-step instructions for handstand tuck
This pose is the foundation of deeper handstand practices. Using this pose as a drill will help you achieve a full vertical handstand.
Start in a downward dog position. Walk the feet so they are halfway toward the hands, putting you in a shortened downward dog position.
Press into the hands and first the shoulder girdle.
Engage the core and raise up onto your toes.
Press up through the shoulders and protract the tailbone.
Jump, sending your hips over your shoulder, and bend your legs, bringing your heels toward your glutes.
Try to find the balance in this tucked position.
Don’t overshoot your balance.
Once you find your balance, squeeze your knees together, keeping them bent.
Breathe.
Slowly release the pose.
If you need to have a wall behind you to give you more confidence as you practice this pose, please do so.
Watch this video with Kino for more detail about trying this pose.
What are some tips for overcoming fear or hesitation when attempting a handstand tuck?
To overcome fear or hesitation when attempting a handstand tuck, here are some helpful tips:
1. Start with the basics: Before attempting a handstand tuck, ensure that you have a solid foundation in basic handstand poses and techniques. This will build your confidence and prepare your body for the more advanced tuck position.
2. Practice against a wall: Using a wall for support can help alleviate the fear of falling over. Start by facing the wall and place your hands shoulder-width apart about a foot away from it. Kick up into a handstand position with your back facing the wall. This will provide a safety net and gradually allow you to work on your tuck.
3. Build core strength: A strong core is essential for maintaining balance in a handstand tuck. Incorporate exercises such as planks, leg raises, and hollow body holds into your regular workout routine to strengthen your core. The stronger your core, the more stable you will feel in the tuck position.
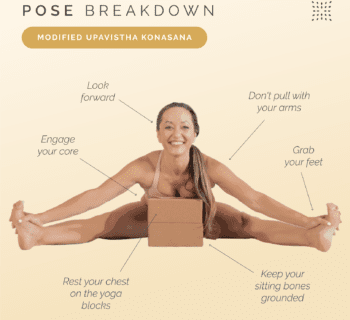
4. Use props: If you’re still hesitant, consider using props such as yoga blocks or a partner to assist you. Placing the blocks under your hands can provide extra support and help you find your balance while tucking. A partner can offer guidance and give you confidence as you attempt the pose.
5. Visualize success: Visualizing yourself successfully completing a handstand tuck can help overcome fear and build confidence. Before attempting the pose, take a moment to close your eyes and imagine yourself effortlessly lifting into the tuck position. Visualizing success can help calm your nerves and mentally prepare you for the challenge.
6. Take it step by step: Remember that progress takes time. It’s important to approach each step with patience and not rush the process. Start by practicing simple drills and gradually work your way up to the full handstand tuck. Break down the pose into smaller, achievable goals and celebrate each milestone along the way.
7. Attend online inversion workshops: Attending workshops taught by seasoned teachers can give you more practical advice about how to reach your handstand goals.
Remember, overcoming fear or hesitation is a gradual process. Be kind to yourself, listen to your body, and trust in your abilities. With consistent practice and a positive mindset, you can conquer the handstand tuck and discover a new level of strength and balance in your yoga practice.
In conclusion, the handstand tuck is a challenging yet rewarding yoga pose that offers a wide range of benefits. By following the step-by-step instructions and modifications provided, you can work towards mastering this pose and experience improvements in strength, balance, focus, and body awareness. Remember to always practice with caution, listen to your body, and seek guidance from a qualified yoga teacher. Embrace the journey of learning and enjoy the many benefits that handstand tuck can bring to your yoga practice.