Embarking on a yoga journey is a transformative experience, one that nurtures both body and mind. Among the myriad of poses that yoga offers, fallen triangle pose, or patitatarasana, stands out as a beautiful blend of strength, balance, and grace. This pose not only enhances your physical flexibility but also cultivates a sense of inner equilibrium and confidence.
For beginners, fallen triangle pose may seem challenging at first glance. However, with patience, practice, and the right guidance, it can become a rewarding part of your yoga practice. This step-by-step guide is designed to help you approach fallen triangle pose with optimism and assurance, empowering you to unlock its full potential. Whether you’re new to yoga or looking to refine your technique, this guide will inspire you to embrace the pose with enthusiasm and a spirit of exploration. Let’s dive in and discover how you can master fallen triangle pose, transforming it into a cornerstone of your yoga practice.
Benefits of Fallen Triangle Pose
Fallen triangle pose is more than just a visually striking posture; it offers a multitude of benefits that enhance both physical and mental well-being. As you incorporate this pose into your practice, you’ll discover its transformative power in various aspects of your life. Here are some of the key benefits:
1. Strengthens Core and Upper Body
Fallen triangle pose is an excellent way to build strength in your core, shoulders, and arms. By engaging these muscle groups, you develop greater stability and endurance, which can improve your performance in other yoga poses and physical activities.
2. Enhances Flexibility
This pose stretches the hamstrings, hips, and side body, promoting increased flexibility. Regular practice can lead to a greater range of motion, reducing the risk of injury and enhancing overall mobility.
3. Improves Balance and Coordination
Balancing on one hand and foot challenges your coordination and balance. As you practice, you’ll cultivate a heightened sense of body awareness and control, which can translate into improved balance in everyday life.
4. Boosts Mental Focus and Concentration
Fallen triangle pose requires concentration and mindfulness, encouraging you to stay present in the moment. This mental focus can help reduce stress and anxiety, fostering a sense of calm and clarity.
5. Invigorates and Energizes
By opening the chest and expanding the lungs, this pose can invigorate your body and mind, leaving you feeling refreshed and energized. It’s an excellent way to start your day or recharge during a midday practice.
6. Cultivates Confidence and Resilience
Mastering a challenging pose like fallen triangle can boost your self-confidence and resilience. As you overcome initial difficulties, you’ll gain a sense of accomplishment and empowerment that extends beyond the yoga mat.
Incorporating fallen triangle pose into your routine can be a transformative experience, offering a wealth of benefits that enhance your physical health and mental well-being. Embrace the journey with confidence and optimism, knowing that each practice brings you closer to mastering this empowering pose.
Contraindications for Fallen Triangle Pose
While fallen triangle pose offers numerous benefits, it’s essential to approach it with mindfulness and awareness of your body’s limitations. Certain conditions may require modifications or consultation with a healthcare professional before attempting this pose. Here are some contraindications to consider:
1. Wrist or Shoulder Injuries
Fallen triangle pose places significant weight on the wrists and shoulders. If you have any injuries or conditions affecting these areas, such as carpal tunnel syndrome or rotator cuff issues, it’s advisable to modify the pose or avoid it altogether to prevent exacerbating the injury.
2. Lower Back Pain
Individuals with lower back pain or conditions like herniated discs should exercise caution. The twisting motion and weight distribution can strain the lower back. Consider using props or modifying the pose to reduce pressure on the spine.
3. High Blood Pressure
The semi-inverted nature of fallen triangle pose may not be suitable for those with high blood pressure. Consult with a healthcare provider to determine if this pose is appropriate for your condition.
4. Pregnancy
Pregnant individuals should avoid deep twists and poses that require balancing on one hand. Modifications or alternative poses that provide support and stability are recommended during pregnancy.
5. Neck Issues
If you have neck pain or cervical spine issues, be cautious with the head and neck alignment in this pose. Keeping the gaze forward or downward can help alleviate strain on the neck.
6. Lack of Experience
Beginners should approach fallen triangle pose with care, ensuring they have a solid foundation in basic yoga poses. Consider working with a qualified yoga instructor to learn proper alignment and technique.
Remember, yoga is a personal journey, and it’s crucial to listen to your body. If you experience discomfort or pain, modify the pose or seek guidance from a yoga professional. With mindful practice and awareness, you can safely enjoy the benefits of fallen triangle pose while respecting your body’s unique needs.
Step-by-Step Guide to Mastering Fallen Triangle Pose
Embarking on the journey to master fallen triangle pose is both exciting and rewarding. With patience and practice, you can achieve this pose with grace and confidence. Follow these step-by-step instructions to safely and effectively incorporate fallen triangle pose into your yoga practice:
Step 1: Begin in Downward-Facing Dog
- Start in downward-facing dog, with your hands shoulder-width apart and feet hip-width apart.
- Press firmly into your palms, lifting your hips high and creating an inverted “V” shape with your body.
- Engage your core and lengthen your spine, allowing your head to hang naturally between your arms.
Step 2: Transition to Three-Legged Dog
- Inhale deeply and lift your right leg towards the ceiling, entering three-legged dog pose.
- Keep your hips square and your lifted leg straight, reaching through the heel for maximum extension.
Step 3: Bring Your Knee to Opposite Elbow
- Exhale and draw your right knee towards your left elbow, engaging your core for stability.
- Maintain a strong plank-like position with your upper body, keeping your shoulders aligned over your wrists.
Step 4: Extend Your Leg
- Gently extend your right leg out to the left side of your mat, resting the outer edge of your foot on the ground.
- Keep your left leg straight and grounded, with your left foot firmly planted for balance.
Step 5: Open Your Chest and Reach Up
- Inhale and lift your left arm towards the ceiling, opening your chest and rotating your torso to the left.
- Keep your gaze upward or forward, depending on your neck comfort, and maintain a strong line of energy from your grounded hand to your lifted fingertips.
Step 6: Hold and Breathe
- Hold fallen triangle pose for several breaths, focusing on maintaining balance and alignment.
- Engage your core and keep your hips lifted, creating a sense of lightness and expansion in the pose.
Step 7: Release and Repeat
- To exit the pose, lower your left hand back to the mat and return to downward-facing dog pose.
- Repeat the sequence on the opposite side, lifting your left leg and extending it to the right.
By following these steps with mindfulness and attention to detail, you’ll gradually build the strength, flexibility, and balance needed to master fallen triangle pose. Remember to listen to your body and modify the pose as needed, embracing the journey with optimism and determination.
Additional Tips for Mastering Fallen Triangle Pose
As you continue to explore fallen triangle pose, these additional tips can enhance your practice, helping you achieve greater ease and confidence in the pose. Embrace these insights to deepen your understanding and refine your technique:
1. Warm Up Thoroughly
Before attempting fallen triangle pose, ensure your body is adequately warmed up. Incorporate dynamic stretches and poses that target the shoulders, hips, and hamstrings, such as cat-cow, sun salutations, and warrior II.
2. Focus on Alignment
Proper alignment is crucial for both safety and effectiveness. Keep your shoulders stacked over your wrist and your hips lifted. Imagine a straight line running from your grounded hand to your lifted fingertips, maintaining this alignment throughout the pose.
3. Engage Your Core
A strong core is essential for stability in fallen triangle pose. Engage your abdominal muscles to support your spine and maintain balance. This engagement will also help lift your hips and create a sense of lightness in the pose.
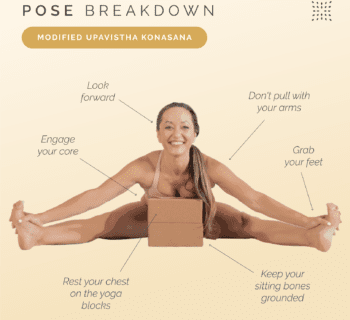
4. Use Props if Needed
If you’re struggling with balance or flexibility, consider using props. A yoga block under your grounded hand can provide additional support and stability, allowing you to focus on alignment and breath.
5. Breathe Deeply
Breath is a powerful tool in yoga. Use deep, steady breaths to maintain focus and calmness in the pose. Inhale to lengthen and expand, and exhale to deepen into the posture, releasing any tension.
6. Practice Mindfulness
Approach fallen triangle pose with a mindful attitude. Pay attention to the sensations in your body, and make adjustments as needed. This awareness will help prevent injury and promote a more fulfilling practice.
7. Be Patient and Persistent
Mastering fallen triangle pose takes time and practice. Be patient with yourself and celebrate small progressions. Consistent practice will lead to improved strength, flexibility, and confidence over time.
By incorporating these tips into your practice, you’ll cultivate a deeper connection with fallen triangle pose, unlocking its full potential and reaping its many benefits. Approach each session with optimism and a spirit of exploration, knowing that every effort brings you closer to mastery.