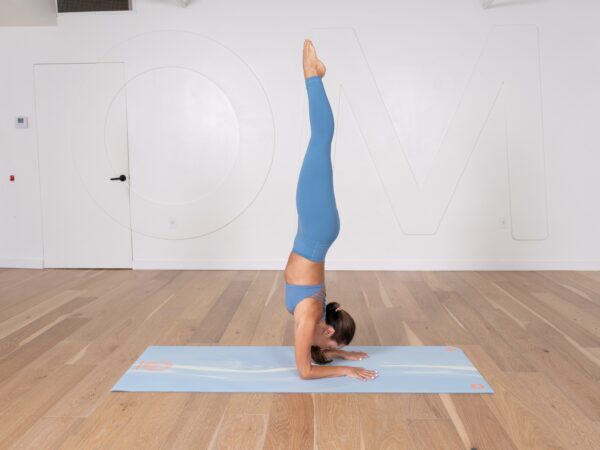
Are you ready to take your yoga practice to the next level? Look no further than the hollowback forearm stand, feather peacock pose, or pincha mayurasana in Sanskrit. This challenging and impressive pose requires strength, balance, and flexibility. While it may seem intimidating at first, with practice and patience, anyone can master this pose.
What are the benefits of hollowback forearm stand?
One major benefit of the hollow back forearm stand is that it strengthens the shoulders, arms, and core muscles. It also improves balance and concentration. Additionally, this pose can help to relieve stress and anxiety by calming the mind and body. So, not only is it a great physical challenge, but it also offers mental and emotional benefits as well. With consistent practice, you can reap the rewards of mastering the hollowback forearm stand and take your yoga practice to new heights.
What muscles are used in a hollowback forearm stand?
This pose primarily targets the muscles in the upper body, including the shoulders, triceps, and upper back.
To hold the pose, the shoulders need to be engaged to support the weight of the body. The triceps are also used to keep the arms straight and steady. The upper back muscles, particularly the rhomboids and trapezius, are also engaged to lift the chest and hold the spine in a neutral position.
In addition to the upper body, the core muscles are also activated to maintain balance and stability. The rectus abdominis, obliques, and lower back muscles work together to control the position of the hips and legs.
Overall, a hollowback forearm stand requires a combination of upper body and core strength, as well as balance and control. With consistent practice, these muscles can become stronger, allowing for longer and more stable holds of the pose.
What are the contraindications of hollowback forearm stand?
When practicing hollowback forearm stand, it is important to listen to your body and avoid the pose if you have any shoulder or wrist injuries. Additionally, if you have low blood pressure or any medical conditions that affect your balance, it may be best to avoid this pose until your health improves or practice with the guidance of a qualified yoga teacher. Remember, safety always comes first in your yoga practice.
How to do hollowback forearm stand
1. Start in a downward-facing dog pose, with your hands shoulder-width apart and your feet hip-width apart.
2. Lower your forearms to the mat, keeping your elbows directly under your shoulders.
3. Walk your feet in towards your hands, lifting your hips up towards the ceiling. Adjust your neck so you are looking at the floor between your forearms.
4. Start to shift your weight forward onto your forearms, lifting one leg off the ground and keeping the other leg firmly planted.
5. As you start to shift more weight onto your forearms, slowly lift your other leg off the ground, keeping your body in a straight line.
6. Once both legs are off the ground, start to hollow out your back, lifting your hips up towards the ceiling and arching your upper back.
7. Keep your gaze forward and your core engaged to help maintain your balance.
8. Hold the pose for a few breaths, then carefully lower your legs back down to the ground.
Watch this video tutorial with Kino for more detailed instructions about how to do the pose.
How can you make a hollowback forearm stand easier?
If you’re working on your hollowback forearm stand, you may be wondering how to make it easier. There are a few things you can do to build up to this challenging pose:
1. Strengthen your core: A strong core is essential for holding any inversion, so make sure you’re incorporating core exercises like plank and boat pose into your routine.
2. Practice dolphin pose: Dolphin pose is a great way to build strength in your shoulders and arms, which will help you hold the hollowback forearm stand. Start in plank pose with your forearms on the mat, then lift your hips up and back into dolphin pose. Hold for a few breaths, then lower back down to plank.
3. Use props: If you’re not quite ready to hold the full hollowback forearm stand, try using props like a wall for support. You can practice kicking up to the wall and holding the pose with your feet on the wall, or place a block under your hips to help lift you up into the pose.
4. Work on your flexibility: The hollowback forearm stand requires a good amount of flexibility in the shoulders and spine. Make sure you’re incorporating stretches like puppy pose and camel pose into your routine to help open up these areas.
How long should you hold a hollowback forearm stand for?
When it comes to holding a hollowback forearm stand, it’s important to start by building strength and gradually work your way up to longer holds. As a beginner, aim to hold the pose for just a few seconds at a time before taking a break. Over time, you can work up to holding the pose for 30 seconds or more.
It’s worth noting that the length of time you hold the pose may also depend on your overall fitness level and personal goals. If you’re using the hollowback forearm stand as part of a yoga or fitness routine, you may choose to hold the pose for a shorter or longer period of time, depending on your needs.
Ultimately, it’s important to listen to your body and avoid pushing yourself too hard. With practice and patience, you’ll build the strength and confidence to hold the hollowback forearm stand for longer periods of time.
Remember, the hollowback forearm stand is an advanced pose and may take time and practice to master. Be patient with yourself and listen to your body – if something doesn’t feel right, come out of the pose and try again later. With perseverance and dedication, you’ll be able to add this impressive pose to your repertoire. Happy practicing!
Do you want more informative yoga tutorials like this one? Sign up for Omstars to get access to thousands of yoga classes to guide you on your yoga journey. Start your subscription today!